Tuesday 22 September 2015

How to Make Your Own Custom Blog Template


I have finally finished my tutorial on How to Create Your Own Custom Blog Template! (or at least customize the Simple Template with your own amazing design) This tutorial is based on the designs that I like to make where the header is placed above the body of the blog in such a way that it looks like it has been cut away from the background as shown below:


This tutorial is my most advanced tutorial in terms of both graphic design skills and HTML/CSS knowledge and is quite long. However, if you have had success with my previous tutorials, don't be afraid to give this one a try!  


To create the graphics for your template, you can use any of your own creations or obtain permission from designers that make digital clipart or any other digital designs. I like to use digital scrapbook kits. In my sidebar are listed the digital designers that I have used for my free designs. I have permission to use their designs because I have paid the commercial license fees they required. If you find a design on the web, make sure that you check the designer's terms of use and/or email the designer to verify their permission for you to use their designs. This is especially true if you have a commercial blog and/or make any income from your blog.

Once you have graphics for your template design, you need to decide what graphics editing program you will use. I recommend either Photoshop Elements or Pixlr.com. If you are fine with a simple design, Pixlr is the way to go. If you want something more detailed, I would use something better like Photoshop Elements.  


Now, let me give you a quick break down of the steps in this tutorial:

1. BACKUP YOUR CURRENT TEMPLATE!
2. Create a Repeatable Background
3. Create a Header, Post/Sidebar Background and Footer
4. Change to the Simple Template 
5.  Alter the HTML/CSS
6.  Make a Few Adjustments
7. Add Extra Designs

Alright, let's get started: 


1. BACKUP YOUR CURRENT TEMPLATE!


 This tutorial can get complicated. If you make any mistakes, I am not liable, so backup your template before you do anything to your blog. Another good idea is to create an additional blog that you can practice on. That way, if anything goes wrong, your practice blog will be affected but your real blog won't be ruined. Once you create your perfect template, you can download the HTML from the practice blog and then upload it to the blog you actually use.

Here is my tutorial on How to Backup Your Template. Be sure to read the full tutorial so that you backup both your template and your sidebar gadgets.

 2. CREATE A REPEATABLE BACKGROUND

This is an example of a repeatable background that I will be using for this tutorial. 


To make this design, I cropped an image from a digital scrapbook kit. (This is from Just So Scrappy's kit "Fresh Squeezed" by Katie Castillo). This image will be tiled across the background of your blog so that it covers the entire screen. This type of background is best because the file size of this image can be very small. A small image size means that when a reader opens your blog, the background of your design will load very quickly. More intricate background designs can get very large and slow down the computers of your readers.

This type of background is essential for this template design but you have 2 options for how to upload your background. I recommend following step below to get more detailed instructions on making the background design. However, I recommend following the instructions in step B to upload your design straight from your computer.

A. Here is my tutorial on How To Make Your Own Background, that shows you how to make the background as well as how to upload it to the web onto a site like Photobucket.


B. If you don't want to host your background image on the web, you can upload it to your blog straight from your computer.

  i. Go to your Template page.
  ii. Click "Customize" (the orange button) so that you are in the Template Designer.
  iii. Click "Backgrounds" from the menu on the left.
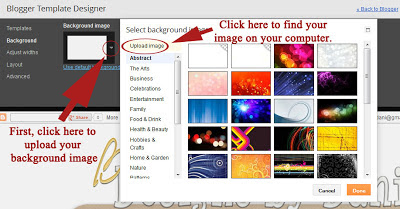
  iv. Click the small gray arrow and then click "Upload Image" in the window that pops up.


  v. Once the image is uploaded, adjust the options as follows:

      a. Alignment: This is up to you. I don't think it matters where the original image starts. I have mine in the top left corner.
      b. Tile: This must be set to Tile.
      c. Scroll with page: I personally get a little dizzy when backgrounds scroll with the page so I unchecked this box. If you like the background to move up and down with your blog, check this box.


3. CREATE A HEADER, POST/SIDEBAR BACKGROUND AND FOOTER


This type of design requires a specific type of header. Here is the header I made for this tutorial:


Notice that the header has the post/sidebar background attached to the bottom of it. This is necessary to give it the continuous look. Also notice that the background behind my title is transparent. It is not white, it is transparent.

Carolynn at Makin' Cute Blogs has posted a video tutorial on how to make a similar design. She offers a video tutorial using Pixlr. The last video shows how to make the post/sidebar background. Here is her tutorial:


For a more detailed header design, you can follow my instructions below. (I am creating this in Photoshop CS4 but you can adjust these for Photoshop Elements, Pixlr or whatever program you have.)

A. Open your design program of choice and open a new file with these dimensions:


The width and height can vary depending on your preference. The resolution should be 72 pixels/inch if you are using another designer's images for your header. (The larger the resolution, the more time it will take to load onto a computer.) The background MUST BE TRANSPARENT!

B. Create rounded rectangles that will act as the background to your post and sidebars. I like to do 3 rectangles but you can do it very simply and just do one.


Notice that the bottom of my rectangles are cut off. If your program allows, you can add shadows to your rounded rectangles. I also used matching digital scrapbook paper from the kit mentioned above to fill these rectangles. (I used layer masks to fill the shapes with the scrapbook paper. There are many tutorials on the web that can teach you how to do this.)

C. Next, add other design elements from your digital scrap kit or other images that you have permission to use. (Remember, you cannot use just any image from the web on your blog. Even if you find an image that does not have a watermark, you do not necessarily have permission to use that image. Be especially careful if you plan to use an image for your logo.)

To learn how to add elements to a design, read my tutorial on How to Make Your Own Blog Button.Once you are done with your design, save your image. You must save your image as a png file. If you don't save it in this format, it will not have a transparent background. To learn what a png file is, read my tutorial on the Difference Between a jpg and a png file

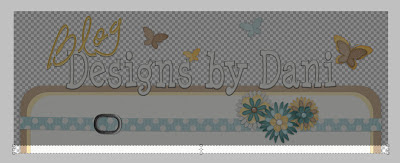
Here is another look at the header I designed for this tutorial:


Notice that the colors I used in my text as well as in the butterflies are light enough to be seen over my dark blue background.

Once your header is complete and saved, go to your blog and upload your header from the Layoutpage. To do this, choose Layout from the drop-down menu on your Blogger Dashboard. Once you are on this page, find the white rectangle that says, "Header". Click "Edit" in this box. A small window will pop-up. Click "Browse" and find your header image on your computer. Then click "Instead of Title and Description". Un-check "Shrink to Fit". Click "Save" and your header will be uploaded to your blog. It will not be positioned correctly or have a transparent background, but that is ok for now.

D. Now we are going to use our header image to create our Post/Sidebar background.

In your graphics editing program, use the marquee tool to select a small sliver of your header as shown below:


I've used the crop tool here so that the small sliver can be seen better. If you use the crop tool to cut out this piece, be sure to save your file with a different file name so that your header is not lost!

Once you select this small sliver for your header, you will need to copy it (possibly "Copy Merged") and then paste it into a new file that is the same size. This image can be very short because it will be repeated vertically all the way down your blog. If you use shadows around the sides of your header, like I did, then you will have to save your post/sidebar background as a png file. If you did not, you can crop your image around the image so that none of the background shows and save it as a jpgfile. 

Once your image is saved, you will need to upload it to a site like Photobucket.  However, Photobucket recently changed things so that unless you have a Pro account, you can't upload images as wide as the ones we are making. If you do not have a Pro account, upload it to Blogger as shown below:

  i. Create a new post.
  ii. In this post, upload your background image as shown below:

Make sure the size is set to "Original size". Also, notice that you won't be able to see the whole image. That is ok.

iii. Next, click the button that says "HTML", right next to the "Compose" button. 
iv. Copy the code right after

<img border="0" src="

  then stop right before the closing quotation marks as shown below:


Do not include the quotation marks. This code is the direct link for the image. Notice that it is a web address (URL). I will be referring to it as the Post/Sidebar Direct Link

  v. Paste this code into a Word or Notepad file and label it the Post/Sidebar Direct Link. We will be using this later.

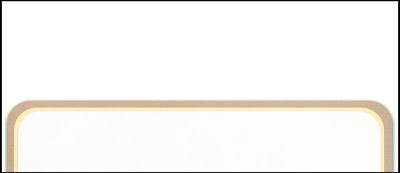
E. Alright, almost done with our images. Lastly we need to make our Footer image. If you have your header open, this part can be quite simple. Take your header image and remove or hide all of theelements except those rectangles that make up the post/sidebar background. (Make sure that you save this with a different file name so that you don't erase your header.) Then, flip your canvas or those images so that the rectangles are upside down as shown below:


I cropped this image slightly so that it was much shorter. If you would like a video tutorial for this, Carolynn at Makin' Cute Blogs has a tutorial below that shows you how to do this in Pixlr.

How to Design a Seamless Border Blog Header, Post Background Section and Footer using Pixlr.com

Once your footer is finished, you will need to save this as a png

Finally, upload your footer to the web using a site like Photobucket or using Blogger. (Same tutorial as in Step D.)

4. CHANGE YOUR BLOG TEMPLATE TO THE WHITE SIMPLETEMPLATE


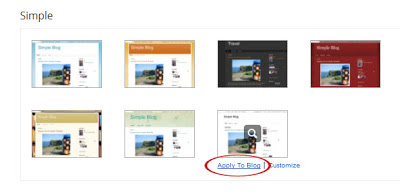
This tutorial is based off of the Blogger Simple template. There are 7 Simple Templates. Choose the last one, the one that is all white.

To choose this template, choose Template from the drop-down menu on your Blogger Dashboard. On this page you will several templates listed at the bottom. Find the last Simple template and place your cursor over the image. You should see the words "Apply to Blog / Customize". Click "Apply to Blog".


If you uploaded the background for your blog through the Blogger Template Designer, you can skip the next steps (A-D)

For those of you that did not upload your background through the Blogger Template Designer, you will need to make a few adjustments to the white Simple Template. On the Template page, click the orange button that says "Customize". This will take you to the Template Designer. Do the following to customize this template:

A. Click "Advanced" from the vertical list on the left side of the screen (in the gray area).
B. Click "Backgrounds" from the second vertical list.
C. Under the words "Outer Background" you will see a white box with a downward arrow. Click this arrow and then check the box next to "Transparent".
D. Do the same thing for the "Main Background".

The Outer Background is a rectangular area covering the entire top portion of your blog from left to right. If you don't remove this background then there will be a white rectangle sitting on top of your custom background. (This is not true if you upload your background through Blogger's Template Designer.)

The Main Background is the background of your posts and sidebars. If you want a custom post/sidebar background as shown in Step #3 you will need to remove this background. Otherwise you will see white on top of your custom post/sidebar background. (This is not true if you upload your background through Blogger's Template Designer.) 


5. ALTER THE HTML/CSS


Now it is time to add to and alter the HTML/CSS of your template to fit each of these design elements.

A. First, we are going to add some CSS:

  i. Go to the Template page and click "Customize"  so that you are in the Template Designer.
  ii. Click "Advanced" from the menu on the left and then scroll down in the second menu until you see "Add CSS". 
  iii. Add the following code into the box:


.header {
width: 1040px;
}
.content-inner {
background: url('POST/SIDEBAR BACKGROUND DIRECT LINK HERE') repeat-y;
background-color:transparent;
background-position: 7px;
padding-bottom:10px;
padding-left:40px;
padding-right:40px;
padding-top:10px;
width: 960px;
}
.footer-inner {
background: url('POST/SIDEBAR BACKGROUND DIRECT LINK HERE') repeat-y;
background-position: 7px bottom;
width: 960px;
}
.footer-outer {
background: url('FOOTER IMAGE DIRECT LINK HERE');
background-repeat: no-repeat;
background-position: 0px bottom;
border: 0px;
padding-bottom:160px;
width: 1040px;
}

B. Now we are going to alter the HTML.
  i. Go to the Template page and click "Edit HTML". (You may want to backup your blog again before editing the HTML, just to be safe.)
  ii. The first change is to move the HTML for the Header outside of the "content-inner" section of the blog. This will set the header above the main portion of the blog and allow it to have a transparent background. To do this:

    Find the HTML that starts with <header> and ends with </header>. (Use Ctrl-F to find this section.)
Cut this section and move it from here (right below <div class='content-inner'>:

To right below <div class='content-outer'> (Use Ctrl-F to find this section.):
  iii. Now we are going to move the Footer section outside of the main body of the blog, just like we did the Header.

    Find the HTML that starts with <footer> and ends with </footer>. (Use Ctrl-F to find this section.) 
Cut this section and move it from here 

To right below
 <!--content-->
 </div> 

This placed the footer section outside of the main section and allowed it to have a transparent background.
  

6. MAKE A FEW ADJUSTMENTS

After entering the code, you may find that your design elements do not line up as well as you would like. For example, when I first entered my code (which I found from Makin' Cute Blogs), the header, the "content-inner", "footer-inner" and "footer-outer were not lined up as shown below:


To help you know how to make your own adjustments, I will go through the CSS code from the beginning of Step 5 and explain what the different parts mean.


.header {
width: 1040px;
}
  
Alter this width to match the width of your header image.

 .content-inner {
background: url('POST/SIDEBAR BACKGROUND DIRECT LINK HERE') repeat-y;

The DIRECT LINK is the URL/code that you copied from Photobucket or Blogger in Step 3. The code "repeat-y", repeats the post/sidebar background up and down (along the y-axis). If you forget this part it may still repeat, but it may also repeat left to right (along the x-axis).
 
background-color:transparent;
background-position: 7px;

If the post/sidebar background does not line up with your header, adjust the background-position. To move it to the left, choose numbers smaller than 7. You can enter 0 and negative numbers if you need to move it that far to the left. To move this background to the right, choose numbers larger than 7.
 
padding-bottom:10px;

The padding-bottom creates more blank space below your posts/sidebar and the footer of your blog. The post/sidebar background will fill this space. For more space, increase this number. For less space, decrease this number.
 
padding-left:40px;

The padding-left is important if you find that your text is too close to the left border of your post/sidebar background. Increase this number to move your text more to the right. Decrease it to move it to the left.
 
padding-right:40px;

You can play around with the padding-right to see what it does. It should adjust the padding on the right, but I found that increasing this number did not make any change for me. Decreasing this number will cause your post/sidebar background to be cut-off on the right.
 
padding-top:10px;

 The padding-top will increase or decrease the space between your header and your posts/sidebar. The post/sidebar background will fill this space. If you have a navigation bar using blogger's Tabs, this space will be above that navigation bar. To increase the space, increase this number. To decrease the space, decrease this number.
width: 960px;
}

The width of the post/sidebar background should be about 80 pixels less than the width of your header but if it does not look right, you can adjust this up or down until it looks right.

.footer-inner {
background: url('POST/SIDEBAR BACKGROUND DIRECT LINK HERE') repeat-y;

Enter the same DIRECT LINK that you entered for "content-inner". The code "repeat-y", repeats the post/sidebar background up and down (along the y-axis). If you forget this part it may still repeat, but it may also repeat left to right (along the x-axis).
 
background-position: 7px bottom;

This background position places the background at the bottom of the "footer-inner" section of your blog. The "footer-inner" is the section of your footer where you can add text or gadgets. 

The 7px places the background 7pixels to the right of this section's left border. If you need to adjust this, smaller numbers will move it to the left and larger numbers will move it to the right. 
 
width: 960px;
}

This is the same as the width for the "content-inner".

.footer-outer {

The "footer-outer" is just the image that you created for the footer. There are no gadgets or text on that sit on top of this image.
 
background: url('FOOTER IMAGE DIRECT LINK HERE');

 The footer DIRECT LINK is the URL or Direct Link that you copied from Photobucket or Blogger in step 3.
background-repeat: no-repeat;

We don't want this footer image to repeat, so leave this as is.
 
background-position: 0px bottom;

This background position places the footer background at the bottom of the "footer-outer" section and closer to the bottom of the browser window. You can remove it or choose "center". Do not use "top" or it may overlap the image above it.

 The 0px places the background right on the left border of the "footer-outer" section. If you need to adjust this, negative numbers will move it to the left and positive numbers will move it to the right.
 
border: 0px;
padding-bottom:160px;

If your "footer-inner" and "footer-outer sections are overlapping, you need to increase the "padding-bottom". If they are too far apart, you need to decrease this number.
 
width: 1040px;
}

This width should match the width of your header image.

Every blog is different so I recommend previewing your changes in the Blogger Template Designer before you save your changes and click "Apply to Blog".

If your blog is looking good, it might be a good idea to backup your template again. You can save it under a new name to differentiate between your original template and this new updated one.

7. ADD EXTRA DESIGNS

The final step in creating your own custom template is adding extra design features such as a post icon, post divider, sidebar titles, blog button etc. There are several tutorials for these shown below:


Also, be sure to customize the fonts and colors on your blog in the Blogger Template Designer. Go to Advanced and then click on any of the options and use the fonts and colors that look best on your blog!

Here is a final view of my custom template:


Thanks for using this tutorial. Leave a comment with a link to your blog. I'd love to see your custom designs!

The CSS/HTML portion of this tutorial was used with permission from Carolynn at Makin' Cute Blogs from her tutorial "How to Create a Seamless Border around your Blogger Blog Layout & have a transparent background behind your Header"

Saturday 19 September 2015

How to Find the Sender’s Location in Gmail

when John sends an email message to Elizabeth, the IP address of the sender (John's computer) is included in the header of the outgoing email message. The receiver (Elizabeth) can then perform a simple geo-lookup against that IP address to find the approximate geographic location of the message sender.

Both Yahoo! Mail and Hotmail include IP addresses in outgoing message headers but if John is sending an email address using Gmail, or Gmail for Google Apps, his IP address won't be included in the message.

IP addresses can be considered sensitive information. As such, Gmail may hide sender IP address information from outgoing mail headers in some circumstances.

If the IP address of John is not available, because he is sending email using Gmail, how can Elizabeth determine John's geographic location? There two options:

Option A: Gmail may include the IP Address

senders ip address in gmail

Gmail doesn't include the IP address of the sender when the sender is using Gmail's web interface to send email. However if he or she is using a desktop client (like Microsoft Outlook) or a mobile device to send that email, the IP address is often included in the outgoing message.

Open the message in Gmail, click on More – > Show Original and search for the line "Received: from " – it may have the IP address of the sender that you can map to a physical location with the help of Wolfram Alpha.

Option B: Find the Sender's Time Zone

When the IP address is not available, you can determine the sender's very-approximate location from the time-zone of the originating computer. Go your Gmail Labs page and enable the "Sender Time Zone" feature.

Now open any message in Gmail and click on the down arrow that says "Show details". The message will display the the current time in the sender's time zone as shown in the following screenshot.

How To Make Your Own OS

How To Build Your Own OS

" Some Tips, Strategies & Things Required To Build Your Own Operating System "

Ever since I dreamt of creating and having my own OS (The Sami OS), I've been Google searching day-n-night to find the best ways to create my own OS no matter how much it costs, but each Website had different and very Complex methods and some were too easy and obvious methods; so I thought of sharing some of these on my Website...

Steps on creating your own OS from scratch: (source: WikiHow) (Difficulty: Hard):

  • Decide what media you want to load your OS on. It can be a floppy disk, CD drive, DVD drive,flash drive, a hard disk, or another PC.
  • Decide what you want your OS to do. Whether it is a fully capable OS with a GUI or something a bit more minimalistic, you'll need to know what direction you are taking it before beginning.
  • Target what processor platform your operating system will support. If you are not sure, your best bet is to target the X86 (32 bit) processor platform as most computers use X86 platform processors.
  • Decide if you would rather do it all yourself from the ground up, or if there is an existing kernel you would like to build on top of. Linux from Scratch is a project for those that would like to build their own Linux distro.
  • Decide if you're going to create your own bootloader or a pre-created one such as GRUB. While coding your own bootloader will give a lot of knowledge of the hardware and the BIOS, it may set you back on the programming of the actual kernel.
  • While it is possible to create an operating system in a language such as Pascal or BASIC you will be better off using C or Assembly. Assembly is absolutely necessary as some vital parts of an operating system require it. C++ contains keywords that needs another fully built OS to run. Don't use it.
  • Start small. Begin with small things such as displaying text and interrupts before moving on to things such as memory management and multitasking.
  • Decide on your API. While this is a long way off it is a good idea to plan ahead. A good API to choose is POSIX, which is well documented. All Unix systems have at least partial support for POSIX, so it would be trivial to port Unix programs to your OS.
  • Decide on your design. There are monolithic kernels and microkernels. Monolithic kernels implement all the services in the kernel, while microkernels have a small kernel combined with user daemons implementing services. In general, monolithic kernels are faster, but microkernels have better fault isolation and reliability.
  • After all development is done, decide if you want to release the code as open source, or proprietary.

If you want an easy way. Consider Linux distros like Fedora Revisor, Custom Nimble X, Puppy Remaster, PCLinuxOS, mklivecd, or SUSE Studio and SuSE KIWI. However, the operating system you created will belong to the company who started the service first. Although you have rights to distribute it freely, change it and run it however you like (but under the GPL).


Alternative Method: Use Suse Studio (Difficulty- Medium)

SUSE Studio is an online Linux image creation tool by Novell. Users can develop their own Linux OS, software appliance or virtual appliance, mainly choosing which applications and packages they want on their "custom" Linux and how it looks. In addition, they can choose between openSUSE, SUSE Linux Enterprise Server and SUSE Linux Enterprise Desktop bases, GNOME and KDE desktops, and an abundance of other features.

To find out how to use Suse Studio, please Click Here and/or watch This Video tutorial.


Another Alternative Method: Use Instructables' Method On Building Your Own OS (Difficulty- Medium)

Instructables recommends using Microsoft Visual C++ 2008 (which requires the learning and proper usage of the C++ Programming language) and another program named Cosmos User Kit. Its a bit easier than WikiHow's way of building an OS but both are overall hard and time consuming but you are free to give them both a try provided you have plenty of free time.

To checkout Instructables' way of building your own OS, Click Here.


Another Alternative Method: Use Tinkernut's Method On Building Your Own OS (Difficulty- Hard)

In 2010, Tinkernut made a Video Tutorial on "How To Make An Operating System", where he briefly showed how to build your own OS using Assembly language. It sounds easy but it really isn't. Infact, if you mess up the Codes then you will end up having tonnes of Bugs and errors. So you really need to have basic knowledge of some (atleast one) Programming language(s).

To checkout Tinkernut's way of building your own OS, Click Here (Its a YouTube Video).

Things to consider before creating your own OS (source: WikiHow):

  • Do not wipe your hard drive completely. Remember, wiping your drive will clear out ALL your data and its irreversible! Use GRUB or another boot manager to dual boot your system with another OS until yours is fully functional.
  • An alternative method of testing your new operating system is to use a virtual machine. Rather than rebooting your computer each time you make changes, or having to transfer the files from your development computer to your test machine, you use a virtual machine application to run your OS while your current OS is still running. Three such VM applications are VMWareBochs (an open source alternative) and Microsoft Virtual PC.
  • Use websites such as http://osdev.org and http://osdever.net to help you develop your own operating system. Please note that you are required to thoroughly know C or C++ and x86 Assembly language. You must also understand general and complex programming concepts such as Linked Lists, Queues, etc.
  • You are also required to have read the processor manuals for the processor architecture you have chosen; whether x86 (Intel), ARM, MIPS, PPC, etc. The manuals for a processor architecture may be easily found using a Google search ("Intel Manuals", "ARM manuals" etc).
  • Do not start an operating system project in order to begin learning programming. If you don't already know C, C++, Pascal, or some other suitable language inside out, including pointer manipulation, low-level bit manipulation, bit shifting, inline assembly language, etc, you are not fit for operating system development.
  • It is an excellent idea to keep a backup of the last working source, in case something goes terribly wrong with the current version or your development PC crashes and is unable to boot.
  • Consider developing it in a team; that way, less time is required and more problems can be solved and generally the OS may be better.
  • It may be a good choice to make a completely new partition for developing the OS.
  • You will not have a full system in two weeks. Start with an OS that boots, then move on to the cool stuff.
  • Check for potential deadlocks and other bugs.

Please refer the Instructions, Tips, Strategies & Warnings on WikiHow. It'll really be helpful for you and if you follow them correctly, you may not end up messing up your existing computer and your OS.

Remember, having your operating system carelessly written to the hard drive can corrupt it completely or even fry it (in theory).


Wishing you all the best with your OS!

Download This Page As PDF (So that you can refer later on)

How To Keep Your WiFi Safe & Hidden From Hackers

How To Secure A Wireless Network (WiFi) From Other People (esp. Hackers) 

In this way, people won't be able to access or use up your Internet, its bandwidth or its download/upload limit.

The reason we secure a wireless network is to stop people from using the services of our network who don't have permission to utilize them. It is harder to secure a wireless network from hackers as compared to a classic wired network. This is due to the fact that a wireless network can be accessed anywhere inside the range of its antenna.

In order to secure a wireless network from hackers, we should take proper steps to save ourselves against security issues. If you don't secure a wireless network from hackers, you might end up without its service. The consequence might also include the utilization of our network to attack further networks. To secure a wireless network from hackers, you should follow these simple wireless networking tips:

  • Try to Password Protect (lock) your Wi-Fi device: This is the first and the basic step to keep your Wi-Fi device safe and secure from un-wanted users or hackers. To do this you might have to contact or consult with your Internet service provider (ISP). You can also use many certain tools, tweaks or programs to keep your Wireless network hidden and password locked. In this way, only you'll be having access to your Wireless network and not others.

  • Strategic antenna placement: The first thing you have to do is to position the access point's antenna in a place which restricts the range of its signal to go further than the required area. You should not put the antenna close to a window because glass can't obstruct its signals. Place it in a central location of the building.

  • Use WEP: WEP stands for Wireless encryption protocol.  It's a customary technique for encrypting traffic on a wireless network. You should never skip it as that will allow hackers to get instant access to the traffic over a wireless network.

  • Change the SSID, disable the broadcast of SSID: SSID stands for service set identifier.  It is the recognition thread utilized by the wireless access point due to which the customers are capable of starting connections. For every wireless access point arranged, select an exclusive as well as unique SSID. Also, if it's attainable, hold back the broadcast of the SSID out over the antenna. It won\t appear in the listing of offered networks, while being able to provide services as usual.

  • Disable DHCP: By doing this, the hackers will have to decode the TCP/IP parameters, subnet mask as well as the IP address in order to hack your wireless network.

  • Disable or modify SNMP settings: Change the private as well as public community settings of SNMP. You can also just disable it. Otherwise the hackers will be able to utilize SNMP to get significant info regarding your wireless network.

  • Utilize access lists: For additional security of your wireless network, and if your access point support this feature, employ an access list. An access list lets your Wireless network device or your Router to determine precisely which machinery is permitted to attach to an access point. The access points which include the access list can employ trivial file transfer protocol (TFTP) now and then in order to download modernized lists to steer clear of hackers.

Keep Your Antivirus & Anti Spyware Up-To-Date: Keeping your antivirus and anti spyware up-to-date really helps you; even though they can be expensive to upgrade they keep your Antivirus' databases up-to-date which can detect the latest malwares & spywares that the hackers might use to access your computer without your knowledge.

The How-To Geek Guide to Scoring Free Wi-Fi

wifiheaderimage2

Readily available internet access is the lifeblood for laptops, netbooks, tablets, and other portable devices. Whether your travels take you to the local coffee house or across the country, never be without free Wi-Fi again.

Every year the sheer number of locations you can score free Wi-Fi increases, but that doesn't mean that finding a connection is as easy as booting up  your laptop. Read on as we outline tips, tricks, and apps to help you surf the web for free.

Proper Security Is a Must

headerimage

The Wi-Fi spectrum is pretty much the wild west of data usage. It is extremely easy for people with malicious intent to skim your data, intercept your wireless transmissions, and even outright set up honey-pot Wi-Fi nodes with the express purpose of collecting your private information.

While the super majority of free Wi-Fi nodes you'll connect to are benign (offered legitimately by businesses, left open by home users, etc.) there's always the risk that the node you're connecting to is malicious. Since there is no way to effectively distinguish between nodes the best thing you can do is configure your connection to encrypt your entire session.

If you have a speedy broadband connection at home you might consider setting up an SSH server on your router. Alternatively you might want use a commercial encryption solution like Hotspot Shield. The goal in both instances is to create a secure tunnel for your data so that nothing (not the web sites you visit, the data you send to them, the data you download, your instant messages, your email, or any of your digital activity) is sent unencrypted.

With a properly configured tunnel (whether to your home router or computer, to your server, or to a commercial SSH/VPN solution) there is no chance that your login credentials or personal information will be leaked no matter how compromised the Wi-Fi node might be.

We don't want to sound alarmist but given how simple it is to set up a basic encrypted tunnel and what an enormous headache it is if your identity/credentials are compromised, there's really no reason to not take the small steps necessary to secure your mobile browsing sessions.

Let Your Antenna Be Your Guide

2011-12-06_113743

If you haven't planned ahead to be somewhere you know there is free Wi-Fi, the easiest way to find free Wi-Fi is to use your electronic devices to look for it. If you're in a big enough location (such as a café on a busy city street or in a major airport) there's virtually no chance that you'll be outside the range of a free Wi-Fi node. This is where our first missive, proper security is must, comes into play. It's nearly impossible to determine the security and origin of Wi-Fi nodes you don't directly control. With a properly secured connection you can just poke away at the open nodes in your environment and pick the first one that lets you in. If your connection is not secured it's best to stick to nodes that appear to be associated with legitimate organizations like the restaurant you're sitting in.

Firing up your laptop just to check for Wi-Fi nodes is a waste of power. Rather than suck down all the energy it takes to power the screen, hard drive, and other components, it's easier and more battery friendly (a rather important goal when traveling) to use your smart phone or tablet. Pull out your device and use the Wi-Fi function to look for nodes. Use the following sub-menus for your respective device:

iOS users should navigate to Settings –> Wi-Fi to check out available Wi-Fi nodes.

Android users should navigate to Settings –> Wireless & Networks –> Wi-Fi Settings.

Blackberry users should navigate to Applications –> Set Up Wi-Fi –> Scan for Networks.

Windows 7 Phone users shoulder navigate to  Start –> App –> Settings –> Wi-Fi

iOS, Android, and Windows 7 all support active notification of Wi-Fi networks. When in the aforementioned settings menus look for an option like "Ask to Join Network" (in iOS) and "Network Notification" (in Android). Keeping the Wi-Fi antenna on and searching does tax the battery more than usual but it also gives you up-to-the-minute updates on available Wi-Fi networks.

Using Wi-Fi Finder Apps and Web Sites

2011-12-06_114917

Barring easily finding Wi-FI nodes by pulling out your phone and scanning for them, you'll need to do a little digging. Fortunately there are a plethora of Wi-Fi hotspot finding applications available for a variety of mobile platforms and as web-based apps.

iOS Wi-Fi Finders: Because of restrictions in the App Store submission guidelines, iOS Wi-Fi finders cannot actively scan Wi-Fi nodes. As a result of this limitation popular Wi-Fi finding apps don't actually actively scan your local networks; they use your location (as provided by the GPS chip) and existing databases of hotspots to alert you to locally available nodes.

  • Wi-Fi Finder: The most popular Wi-Fi finding app in the App Store, Wi-Fi Finder taps into the vast JiWire database to help locate both free and paid Wi-Fi hotspots in your locale.
  • Boingo Wi-Finder: Shows free and Boingo sponsored hotspots near your location.
  • Free Wi-Fi Finder: Another location-based free Wi-Fi finder.
  • WiFi Get Lite: Includes a large offline database so even if you're having trouble getting connectivity you can still search for free Wi-Fi locations.

Android Wi-Fi Finders: Unlike the App Store restrictions Apple developers work under, Android developers have full access to the Wi-Fi component of the device. When selecting applications for Android you have your pick of Wi-Fi database apps and Wi-Fi scanners.

  • Wi-Fi Finder: The same popular app from iOS, now available for Android devices.
  • Free Zone Wi-Fi: In addition to helping you locate free hotspots, Free Zone Wi-Fi will automatically connect you to free Wi-Fi nodes, sync your data, and disconnect you in order to cut down on cellular data charges.
  • WeFi PRO Beta: WeFi offers an interesting twist on hotspot discovery. The WeFi app both scans available hotspots and simultaneously reports them back to WeFi while showing you the best local connection.
  • Open WiFi Scanner: Unlike the previous two apps, Open WiFi scanner is simply a scanning tool that enhances Android's built-in scanning/notification tools.
  • Wifi Analyzer: Although intended to diagnose networks, Wifi Analyzer is a popular and robust Wi-Fi analyzer.

Web-based Wi-Fi Indexes: Although it's far more convenient to access Wi-Fi lists via an app specifically customized for your phone, web indexes can be useful tools for scoping out free Wi-Fi—especially if you're already on a Wi-Fi spot and want to plan ahead for later connectivity.

Between the phone-based and web-based apps you should have little problem finding nearby hotspots.

Tether Your Devices to Your Phone

2011-02-23_1501

This isn't exactly in the same class as finding free Wi-Fi but when you're desperate for internet access sometimes you bend the rules a little. If you don't already have a phone/data plan that supports tethering (with your provider's blessing) you can use third-party tethering apps to connect your phone's data stream to your laptop.

One of the most popular and long standing option is to use PDAnet and your sync cable. We shared a detailed guide to setting up PDAnet here. It's, by far, the most popular tethering app around and is compatible with Windows/Mac computers and Android/iOS/BlackBerry/PalmOS/Windows Mobile phones. It comes with a 14-day free trial after which it continues to work but doesn't allow you to visit secure HTTPS web sites. The full app will set you back $15. Again, PDAnet requires that your device either be connected with the sync cable or synced via Bluetooth; it's a really solid solution for tethering your laptop but not a viable solution for multiple devices.

If you'd like to turn your Android phone into a Wi-Fi hotspot for multiple devices, you'll need a rooted phone (the Android equivalent of jail breaking) and a copy of Android Wi-Fi Tether installed.

iPhone users, unfortunately, don't have any easy no-jailbreak solutions for temporary tethering short of paying extra money for hotspot service. For those who have or are willing to jailbreak their phones, MyWi is an excellent jailbreak only application that enables both sync cable, Wi-Fi, and Bluetooth tethering between the iPhone (and the iPad with 3G) and supported devices. It comes with a 3-day trial if you'd like to take it for a test spin before shelling out $20.

There are a few things worth noting about tethering your phone to your other mobile devices. First, it most certainly violates your cellphone contract (even though most providers completely ignore casual usage). Second, it's really easy to chew up data usage when you're using a laptop and/or multiple other devices—while your provider may not care that you're using a third-party tethering app they most certainly will care when you exceed your data usage for that month. Finally, both sync cable tethering and (especially) Wi-Fi tethering are rough on battery life. Expect your battery usage to sky rocket while tethering and plan for frequent charging or keeping your phone plugged in while tethering.